Creating a login page
- Creating the front end interface;
- Writing the business rules;
- Writing the interface with the database.
In a previous post I already described a form which added records to a data table. In that example I was a bit sloppy, because I omitted any business rules code. My excuse was that the data table in that example was intended to be populated automatically, so the input form would never be used in real life.
I am now dealing with a request from a school to track student performance, so I have to create a manual database portal or interface for them. The first step is the login screen. At a trivial level, this is just a couple of fields and a button, so not much thought needs to go into it.
But as I am using the exercise to stimulate a web site redesign, I have chosen to go a little deeper. My usual method of making forms look reasonably neat is to shove them in a table. But the HTML purists don't like table any more, so I decided to look into using the <div> tag instead. At the same time, I extended my use of the external CSS page, which I used in my previous post.
Whether correctly or not, I followed the pattern of a table, with a series of horizontal rows, each nested with two "cells", one floating to the left, the other to the right, and all inside a "zone" which I classified as "inputtable", which in turn lay inside the page (code not shown) created in my previous post:
<div id=logintable class=inputtable>
<div id=row0 class=row>
<h3>Initial Login Screen</h3>
<form>
<div id=row1 class=row>
<div id=cell11 class=col1>Please select user or admin</div>
<div id=cell12 class=col2>
<select name="usertype" class=cbox>
<option value="user">user</option>
<option value="admin">admin</option>
</select>
</div>
</div><br/>
<div id=row2 class=row>
<div id=cell21 class=col1>Please enter your name</div>
<div id=cell22 class=col2><input type="text" name="username" class=itext  /></div>
</div><br/>
<div id=row3 class=row>
<div id=cell31 class=col1>Please enter your password</div>
<div id=cell32 class=col2><input type="password" name="password" class=itext  /></div>
</div><br/>
<div id=row4 class=row>
<div id=cell41 class=col1>Click button to log in</div>
<div id=cell42 class=col2><input type="submit" value="Log in to Portal"  class=itext /></div>
</div><br/>
</form>
</div>
</div>
To accommodate the extra classes, the CSS page was expanded as follows:
body {
margin:10px 0px; padding:0px;
text-align:center;
}
#container {width:800;}
#header {background-color:#151B8D;text-align:left;}
#left {background-color:#5CB3FF;height:500px;width:15%;float:left;text-align:left;}
#content {height:400px;width:85%;}
#footer {background-color:#488AC7;clear:both;text-align:center;}

a:link {text-decoration:none;} /* unvisited link */
a:visited {text-decoration:none;} /* visited link */
a:hover {text-decoration:underline;} /* mouse over link */
a:active {text-decoration:none;} /* selected link */

h1.top {margin-bottom:0;color=#FFFF00;}
h3.top {margin-bottom:0;margin-top:0;color=#FFFF00;}
a.top {color=#FFFF00;}

h1.main {margin-bottom:0;text-align:center;}
h3.main {margin-bottom:0;margin-top:0;text-align:center;}

a.menu {color=#000000;}

.inputtable {margin:50; background-color:#BDEDFF}
.row {width:420;}
.col1 {text-align:right; float:left; width:200; margin:0 5 0 5;}
.col2 {text-align:left; float:right; width:200; margin:0 5 0 5;}
.itext {width:150;}
.cbox {width:150; margin-left:5;}
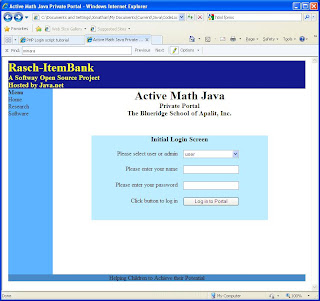
And the finished page looked as follows:


Comments